Admin
If you are paying by Credit Card Authorisation or Direct Debit Authorisation you will need to refill a form and send it to us. If you don't have one of these forms please contact us on 1800 677 656 or email support@aspedia.net and we can send one to you.
Mastercard
Visa
American Express (please note there is 5% surcharge on Amex)
Yes you can. Please call accounts on 1800 677 656 and we will arrange this for you.
No, you can only pay by Direct Debit or Credit Card Authorisation
Your monthly hosting fees can be paid in 2 ways:
1. Direct Debit
2. Credit Card Authorisation
There are a number of ways to pay an invoice:
1. Credit card - Please call 07 3394 8225 and speak to our Accounts Manager Denise who will then use Secure Pay
2. Direct Deposit to:
Account Name-Aspedia Australia,
Bank Institution-ANZ Bank,
BSB- 014 240,
Account number - 4989 60892
3. Direct Debit- please fill in a Direct Debit Form which is then sent FFA Paysmart.
Domains & Hosting
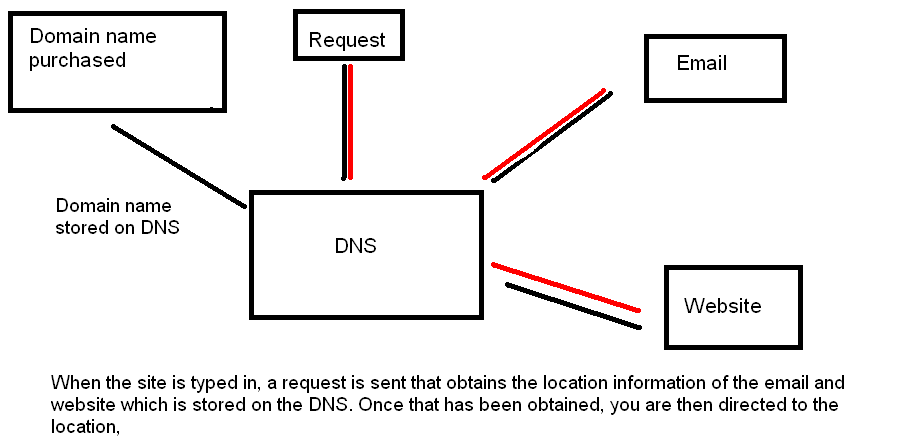
The name you have purchased sits on our DNS server (different to a web hosting server) and when a user is searching for you, we direct them where to find your details. The DNS server points to where IP addresses are for your website and e-mail inboxes.
You are not required to have domain name hosting to keep holding onto the name you have purchased (called domain name registration and renewal), but it is a service you will require if you want people to find you online. Many companies offer DNS hosting, however, if you keep your website, domain names and DNS hosting all in one place it is easier for you to update details.
Domain names are similar to a licence.
As you hold the domain name licence you can do what you want with it. All domain names we register are registered in the customer's name. This means that for the duration of the registration period YOU are the licence holder of the domain name.
When the licence is due for renewal, you will have to pay a renewal fee. If you do not renew the licence, then it will become available for any eligible applicant to register on a first come first served basis on the Domain Open Market. This is why it is very important to pay your renewal fee for your domain name every year before the due date. If you don't you will get caught out and lose the rights over your Domain Name and you will also lose the use of your website.
A "top-level" (or TLD) domain is what comes after the last dot in a webname. The most commonly known top-level domains are .com, .net, .org and .au. The top level domain types .com, .net and .org have been around for several years (since the Internet took its current form). Most of the possible (and comprehensible) domains have been allocated from those domain types. There are also country-specific top-level domains, such as .uk for the United Kingdom and .au for Australia. The .au country-specific TLD is one of the best regulated (see AUDA) TLDs and all domains within it are precisely and comprehensively allocated (thats our job!).
.au is the top level domain for all Australian domains. .au webnames are your opportunity to reach a worldwide audience with information about you, your ideas, or your organisation.
Within the .au top level domain there are five domain types under management by AusRegistry - .com.au and .net.au, .org.au, .id.au and .asn.au. Each of these domain types serves a specific purpose in the community. By choosing the right domain type for your website's domain, you can reach the relevant audience that you require.
1. Domain names are your Internet address. Most domains are registered by business as a way of providing information and a means of communication to their customers. Many businesses register their domains in multiple countries in order to protect their brand. Owning your own domain also allows you to have a personalized email address and website if purchased with hosting. Rather then using generic emails like hotmail and gmail you have setup, you can have an individualised email e.g. joe@joesbuilding.com.
2. Domain names are portable. With your own domain name, you are no longer tied to your ISP to access email or host your website. No more changing email addresses when you change ISP's!
3. Domain names improve search engine rankings. Search engines rank websites with their own domain names higher than those using an ISP address.
4. Domain names show professionalism. Why advertise a website address like: http://www.yourisp.com/user123/ when you could have www.yourdomain.com. Your customers will be more confident dealing with your company if you have your own identity on the internet for your website and email.
5. Domain names are memorable. A long website or email address at your ISP can be difficult to remember. A short, relevant domain name is memorable and will increase traffic to your site.
A domain name (e.g. aspedia.com.au) is your own unique address on the Internet. It is how your customers will remember you and find you among the millions of other web sites on the Internet.
Yes you can have several domain names pointing to the main domain name. For example it would be beneficial to have both .com.au as well as .com or even .net. and .net.au. That way if a client accidentally puts one of these in it will still go to your website.
The quicker you can fill in the Transfer Form and send it to us the better as it can take up to 10 working days for a transfer to come through.
If we look after your domain name as well as your website then you only have one company you need to call for any changes or support. This will save you time and money.
As we are a local company you will be able to contact us and speak to a "real person" not a computerised message.
Aspedia can help you with this. All you have to do is fill out a Domain Name Purchase Form
We will do the rest.
All domain names are $110 per annum
Domain names are renewed every 2 years
- .com.au or .net.au domains are $137.50 for 2 years
- .com or net domains are $99.00 for 2 years
Two important pieces of information is required:
1. Domain name
2. Password
To obtain your domain name password if you don't already have it you will need to contact the Person/Company that currently manages it.
Once you have these two items you will need to fill out a Domain name Transfer form and send it to us.
Once we receive the form and proceed with the transfer it can take up to 20 working days for the transfer to be activated.
eCommerce
An eCommerce website allows you to engage your customers and trade with them without needing to go to the expense of an actual physical store front. Customers are able to view, inquire about, and purchase your wares directly. You're able to keep your costs low as your supply options are less restricted because you don't need to keep a shop fully stocked. You're able to be far more flexible in how you sell your products, as adapting your store to any changes in your business is rapid and effective.
This flexibility is available even if you don't want to have customers purchasing directly from your site. There is no requirement for an eCommerce website to contain a purchase process.
What we are able to do for you is to use the power of our eCommerce system to present your catalogue of products in the most effective manner possible, driving sales to your business whilst keeping the implementation simple and flexible enough to adapt to change and the growth of your business. Need to display your products by category? We can do that. Need sub-categories? We can do that too! Need your products to appear across different categories and inside sub-categories of a sub-category? We can do that!
Here is a step by step guide to download (with screen shots) to help you. Alternatively, you can just read the information below (without screen shots)
Firstly you must determine the type of product you are selling - will you ship it, can the customer download it , are they buying a voucher to complete the purchase later, and does your item have multiples of the one thing ie different sizes or colours. You can have a mixture of these within your website, but you must choose the correct method when setting it up, as you cannot edit the type of product - you have to start again.
- From the administration menu choose 'Create Content'
- Scroll down to 'Product'
- From the list of products choose the correct one for your purpose - Product Types are:
- Product Variations allow a product to have multiple available versions with some variation and optionally unique prices per variation. ie Size, Colour, finish - (see further detail on setting up a Variation Product in our eCommerce Drupal Module)
- A shippable product is a tangible, physical item. Optional features includes inventory control and availability estimates but no variation in sizes and colours
- A Gift Certificate Creates Certificates for customers to use for later purchases.
- A Non Shippable product is more flexible and can represent a good or a service. ie downloadable product, or 'book and pay' for a service.
- If you want your item to appear in more than one category ie in tops as well as specials, hold down the Ctrl Key on your keyboard while you select each category with your mouse.
- To upload an image, click on browse and choose from your computer, find the image and either double click or click and 'open'. Then click on Upload.
its best to have all your product images ready in one section on your computer and resized to what you require for your website. Read more on resizing an image - Complete all the required fields including 'Sell Price'. This price should include the gst, however it's dependent on the site itself and how it's themed based on what you've ask in your set up.
- Leave the 'Add to cart' link as the default unless you are setting up a Variation Product, then you should choose 'Hidden'.
- If you want to manage how many items you have with inventory control - then tick the 'Manage Stock' box.
- The Product Weight and Size fields are mainly for your reference and are not required for you to complete. If you are using a complex shipping method that requires weight and size, there will be other fields you will have to complete with that module. You will be given separate instructions for these fields.
- If you are not sure about the fields and whether you require them, such as 'renewable schedule' and 'priority' - leave them as the default. We will give you instructions if you need to choose these.
- Scroll down and save your product
Product Variations are used when you have one item that comes in different variations, but you could use the one image in your product catalogue ie, a t-shirt might come in white, blue and red, but each colour will also come in small, medium, and large - so this product will have 2 variations for the one item - 1: Colour, 2: Size.
If you would like further instructions on setting up variations for your website view our instructions here
You would create a Variation Product when your item has different colours, sizes or various different attributes for the one item, ie a top that comes in small, medium and large, as well as red, blue and white. Each variation product must have at least one attribute for the customer to choose from. If you don't believe you have any attributes for this product, then, choose a shippable or non-shippable product type.
First you need to set up your Variations and Attributes so that you can choose from these lists when you set up the product.
- Go to your administration menu and choose from eCommerce Configuration - Product Variations - Attributes (note do not change anything in Settings, or Variations Products List).
- There may already be some items in the list of Attributes - Scroll to the bottom and type in the blank field, an Attribute name that will make sense. ie Size.
- Choose Primary
- Don't worry about changing the Filter box unless you get special instructions from the Aspedia Support team
- You Must Reorder your Primary Attributes above your Secondary Attributes, do this by dragging the cross to the left of the Attribute to it's correct location
- Click Add Value
- Save Your Page after you've re-ordered.
Note, The order that you put your attributes in this list - will be the order that your customer will choose when they are purchasing your product.
Do Not Add another Attribute at put it above Primary Attributes that are already in the list once you have already created some products. Only add further Primary Attributes below the existing ones. This could affect the existing products that you have already created.
Now you need to add the Values that belong to this Attribute - click on Values in the same line as the Attribute you want to add values
- Enter the first Value in the blank field ie Small, or medium, or 1 Litre, or 500ml
- If you are going to ask for more dollars for this value, enter the increase in 'Price Adjustment' ie Gold might cost 20% more than Silver or XXL might cost $1 more than small. Just add the increase on the base price which you will include when you set up the product. If you aren't charging more - leave this field blank
- If you want to restrict some customers from seeing some of the attributes, then you can choose who will see it here - if you want to sell to everyone - leave it blank.
- Click on Add Value
- Keep repeating this until you have entered all the values you expect you will use over all your products. ie Small, Medium, Large, XL, 8, 10, 12, 14, 16
- Then Click on Save
Note, The order that you put your values in this list - will be the order that your customer will see in the drop down when they are purchasing your product. You can come back and add more Values later.
Now you will create your product
- From the administration menu choose 'Create Content'
- Scroll down to 'Product'
- From the list of products choose Product Variations
- If you want your item to appear in more than one category ie in tops as well as specials, hold down the Ctrl Key on your keyboard while you select each category with your mouse. (The categories should already be set up by Aspedia as per your instructions when designing your website).
- To upload an image, click on browse and choose from your computer, find the image and either double click or click and 'open'. Then click on Upload.
its best to have all your product images ready in one section on your computer and resized to what you require for your website. Read more on resizing an image - Complete all the required fields including 'Sell Price'. This price should include the gst.
- You Must remember to tick Hidden in the 'Add to cart' link - as the cart will create one for the attributes (you only need to do this for Variation Products)
- If you want to manage how many items you have with inventory control - then tick the 'Manage Stock' box.
- The Product Weight and Size fields are mainly for your reference and are not required for you to complete. If you are using a complex shipping method that requires weight and size, there will be other fields you will have to complete with that module. You will be given separate instructions for these fields.
- If you are not sure about the fields and whether you require them, such as 'renewable schedule' and 'priority' - leave them as the default. We will give you instructions if you need to choose these.
- Scroll down and save your product
 After you save your product you will need to add in the variations - you will see an error signal until you add your first attribute and the values to the product (this is normal).
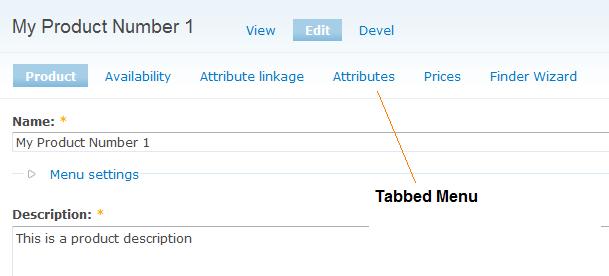
- The first time you are setting up a product the system will automatically take you to the correct page to add your attributes. If you need to go back and edit your attributes, you will have to choose from the product menu 'Attributes' which is tabbed along the top of screen.
- Tick each box of the attributes that you require for this product.
- Scroll down and click the save button.
- Now click on 'Availability' from the tabbed menu
- This is where you will set up which values from each attribute are required for each product. First check what stock you do want to set up
- From your first attribute choose either all or one of the fields
- If you have a second attribute choose either all or one of the fields etc
- Don't worry about 'Filter Selected' unless you have been given specific instructions from the Aspedia Support Team
- Click 'Add Selected'
- Repeat this until all your values have been chosen all the items that you want to sell for this product.
- If you have combinations of attributes that are not available, you can remove them from the list of available configurations before your save your page so customers cannot attempt to purchase them.
- If one or some of your products are going to cost more or less than your default price - this is another area where you can set what they would cost - this is an override price, not a percentage or dollar increase/decrease
- When you have all your items right - Scroll down and click save
- If you would like to view your product - click on 'View' in the menu above the tabbed menu. You can continue to Edit your product if required by clicking on the edit button.
If you understand what an Attribute is for a Product Variation you may require to set up secondary attributes. However, you would only set them up if you required a customer to choose a product, then choose a attribute, before they would even see the options of a secondary attribute.
- For example, you might sell Cars, Your product would belong to a category - which might be Car Make A, B or C
- Within the Car Make, you might have a products that include, Small Car, Family Car, Ute, and 4 Wheel Drive.
- Say for example if you chose the Small Car the first attribute/s may be Sedan or Hatch, as well as Automatic or Manual
- Until you've chosen which of these you are looking for, the system can't tell what all the features are available, which might for the Sedan, 2 or 4 door, but for the hatch 3 or 5 door. These secondary attributes belong to specific primary attributes.
Most websites aren't this complex, but our Drupal eCommerce system can handle it if you do have a complex sales process.
A second example may be
- You sell furniture
- Your categories are set up, bedroom, lounge, kitchen, dining
- Your products within lounge room are lounges, chairs, coffee tables etc
- Within your lounge product - the primary attributes may be 2 or 3 seater, Small or Large cushions
- While the secondary attribute could be all the different fabrications that the lounges are available in. This is a slightly different example, because the fabrics are available to both the 2 or 3 seater, but to place the order, you need the customer to choose the attributes separately.
If you are unclear if you need to set up primary or secondary attributes, please contact our support team.
Shipping can be quite a complex solution, and your website will be set up according to what you discussed with your salesperson when you gave instructions on your requirements.
The types of shipping modules we can include in your Drupal website are:
- A dollar value per item added to the cart once all items are chosen
- A dollar value per order added to the cart once all items are chosen
- You will have to include weight and dimensions of each item plus the customer must choose delivery address before they are shown the shipping cost. (This probably isn't appropriate if you have large items to ship).
Unfortunately, you can't choose some products with one shipping method and other products with another shipping method - the shipping method has to be site wide.
For some customers, you can make money on your shipping, while others may choose to loose a little on their shipping to get the sale. We recommend when you discuss shipping on your website, you call it 'postage and handling' or similar, so that the customer understands it includes more than just the postage or courier value. This way you can charge a little more so that you won't be out of pocket.
We also have certain systems available that allow you to get an individual quote, for example, E-Go Freight allows you to get a quote for shipping during the checkout process provided all the required information has been completed for your products and the customer has entered valid postcodes.
If you have a specific freighting system you wish to use and you would like to integrate it into your site this is certainly possible. However, we require that they provide an API to us to utilise and communicate with and here will be a development cost associated with this if the API meets the requirements.
Enabling the shipping-api adds the option to the transaction list screen to send the shipping notification email, if there is no shipping module installed then the option does not appear.
To select the shipping model that is best for you, it's important to consider how much of an impact it has on the purchase process for delivery to a customer.
This depends entirely on the type of details you are wanting to change, we recommend you contact us to ensure the best possible presentation and accuracy of your Tax Invoice is maintained. Some things are quite simple to change and our support team would be able to help you via email or phone should you just wish to change any of the additional charges or discounts your site may offer.
However if you wish to change the layout or heavily customise the design of the Tax Invoice you will need to arrange a time to meet with us to discuss these changes.
When the customer receives the invoice is dependent on how your eCommerce system is structured within your site. For example, a straight forward eCommerce site with simple products and a Cash On Delivery payment method, will send the customer their invoice as soon as their order is placed. However for a more advanced site that utilises a different payment system, such as PayPal or SecurePay will have their invoices sent to the customer once their payment has been cleared and completed.
No, you first need to choose transaction complete and then you can inform them via email.
The customer receives the Tax Invoice as per the site setup, but there is no additional notification sent to the customer to indicate that you have received the order. As part of the eCommerce setup is to automatically notify you in the event of an order being placed, and the customer is sent the Tax Invoice at this time there is no need to send an additional notification to the customer.
Don't forget as well that we don't want to spam the customer with communications, too many emails from a website has the very real chance of annoying your customers and disuading them from buying from your store again.
There are two statuses for every transaction :
Workflow & Payment. Both of these will trigger certain actions on the site when they are selected and saved. Cash On Delivery is an exception to this as it requires you to manually set the payment status of the transaction to completed, in addition to updating the workflow status of the transaction.
Aside from updating Transaction workflow statuses to 'Complete', there will be little need to monitor and manually adjust the workflow of specific transactions as the system handles it itself.
When you have an order that you needs to be processed:
- Login to your website
- Go to the administration menu and choose eCommerce - scroll down to transactions
- The first column TXNID - is the number of the transaction
- The second User - is the name / email of the person who purchased
- Payment Status shows who has paid and who hasn't - if the payment is pending - the client hasn't paid yet, they processed the order but once they left your site to continue the purchase with the bank or pay pal etc - the payment hasn't gone through yet. If the payment status says completed - the money has been received and you will have a received an email from the website to let you know an order has arrived.
- Workflow is where the order is up to along the processing path - depending on the setting in this workflow will depend on how often or not the website sends you an email reminding you of this order. The settings are:
- Received - sends an email every 6 hours.
- Invoiced - allows you to print the invoice to send with the product and sends an email every 12 hours - it will display the invoice on screen and you can choose where to print it
- Shipping Notify - is a pre-sent email message that allows you to send this to the client from within the website - you will have to modify the email if you want something else written and click the submit button to send the notification to client. If the client hasn't given you an email address, you might be able to get one from the notification sent by your payment provider.
- Ask Customer - is an email template that lets you email the customer from the website - note that whichever address is set up as the system default will be where they respond. If you save the transaction with this status - if means that if anyone else looks at the transactions they will know you have asked the customer a question pertaining to the order and are waiting to hear back.
- Cancellation - is a pre-sent email message that allows you to send this to the client from within the website - you will have to modify the email if you want something else written and click the submit button to send the notification to client.
- Resend invoice - sends a copy via email to the client that has purchased. You won't even have to click submit for this to work - you only have to choose 'resend invoice'.
- Completed - means the website won't send any reminder emails to you - and all your staff understand the order is finished.
- To change the status that is showing - click on edit on the far right of the line
- From the Transaction workflow drop down - choose the status that you want to appear (if you clicked on the 'change workflow' checkbox within each of these transactions, the website will update them automatically and you won't have to edit the transaction yourself).
Also on this page you can view the value of the order, when it was ordered, when the status was changed last, the items that have been purchased, as well as take you straight to the product for you to update anything. (Be careful changing quantities here if you have product variations - you might be better going to the product through the menu and changing quantities on each size / colour of the item).
You will receive an email at the address that was supplied by you - if you want this updated at any time, please notify our support staff and they can change it for you.
The email will let you know there is an order on the website with a total amount and who has purchased it. You will only receive the email if the payment status is completed - this means that you have received the money from your payment provider. Read more on Payment Status for eCommerce Orders here.
You can access your email from the Cloud or set it up to view through your own computer, tablet or phone.
If you want to keep all your email and access it in the cloud - you won't need an email client on your device. You'll be accessing our email servers to view and answer your emails.
If you want to access from the cloud and also download a copy to your device so that you have both - you'll need to use Imap settings for your device. There will be a copy on your device and a copy of the same email in the cloud. If you delete from either place - both places will be updated.
If you don't want a copy of the email saved in the cloud, then you should chooes the POP settings and it will remove each email from the cloud and pop it down onto your device.
To access your mail in the cloud:
Navigate to:
https://webmail.aspedia.net/
Enter your full email address and password.
To Set up an Email Client on your device:
Example of an email client that you can use on your device include:
- Microsoft
- Thunderbird
- iPhone
- Samsung
The way that you add your email address may be slightly different for each of these types. Therefore follow their instructions which you'll most likely find by searching online.
These are the server settings for Incoming and outgoing mail:
mail.aspedia.net
Your full email address
Your password
Port 993
An 'incoming mail server' is one that collects all email that is sent to your addresses.
From there you can access them online (see our FAQ on accessing your email) or you can access the email through an email client on your device.
An 'outgoing mail server' is one that sends your emails out into the world wide web to find where it is meant to be delivered. You computer has nothing to do with the email once it has been sent. This server is usually provided by the company you have your internet connection through for example Telstra - it has nothing to do with your website.
If you cannot get email to work on your computer, you can access your mail via an internet browser as long as you have requested Aspedia to set it up as Imap. If you are popping your mail down, then it may not be available online for you to view it.
To see if it's available:
Open a browser
Navigate to: mail.aspedia.net
This will display a round cube login.
Enter your full email address and password.
You will now be able to see your mail in a web version to receive and send as usual.
When you get your computer working again - you will be able to see that mail on your computer.
We are located in the Brisbane Technology Park, Eight Mile Plains.
Our address is Level 1, 4 Clunies Ross Court, Eight Mile Plains, QLD 4113
Using Your CMS
WYSIWYG
WYSIWYG is an acronym for "What You See Is What You Get" which is the primary editor used for content.
A "WYSIWYG" editor allows you to apply standard features to website content that has been inserted into the "Body" of your web page. It is also the main source for adding an image to a "Page" or any other Content type that has a "WYSIWYG".
In the WYSIWYG you can:
- Bold & Italic
- Change the positioning of text
- Undo and redo
- Create bullet points
- Create links
- Create Anchors
- Insert Images
*Note - for the WYSIWYG to appear in the Body of your page you need to be logged in to your website.*
To Bold and Italic Font 
Before you start writing click on either the B or I in the "WYSIWYG", from here everything you write will be as you selected. If you want to turn this off then unclick either the B or I and continue writing and you will notice that the font will go back to being normal.
To change the alignment of font 
Before you start writing you can decide if you would like the writing to start on either the left, middle or right within the Body. These options are in the "WYSIWYG". You can make different sections go to different sides if you wish, you just select which alignment you would like before writing. If you change your mind once you have written everything then simply highlight what you would like to change and click the alignment you would like.
Undo & Redo 
If you make a mistake and don't want to use the delete or backspace there is the option of an undo button this will undo what you have done since the last time of saving. The redo will go back to what you last did if you click the undo button too many times.
Bullet Points and Numbering 
Bullet points are used for several things eg - lists. Bullet points in the" WYSIWYG" are the same as Word. Simply click the bullet point you want (solid or numbered) and write your content. Once you have written everything you want in bullet form you can either enter and turn the bullet point off or enter down twice and it will automatically turn off. Again if you want to make something into bullet points after writing it simply highlight the wording and click the bullet point you want.
Insert an Image 
To insert an image to your website, it first must be uploaded from your computer to the server. We have written a detailed instruction in other FAQ's, see below for how to insert an image in Drupal.
*Please always remember to regularly save your work*
Here is a step by step guide to download (with screen shots) to help you. Alternatively, you can just read the information below (without screen shots)
Depending on how your website has been configured, there are maybe a couple of ways for you to edit content.
The first is very simple
- Login to your website
- Go to the page you want to edit
- Click the edit button
- Make the changes you require
- Scroll down and click Save
If your webpage doesn't have an edit button
- Login to your website
- Go to your administration section and click on Content Management
- Choose 'content' and view the 'list', this will show every content item that has been created for your website
- If you have a very long list of content you may want to 'filter' to find your item more easily. Click the radio button 'type' and choose from the drop down menu which item you are looking for
- Click 'filter'.
- Once you view the content item you are searching for you can either, click on the name, or click on edit in the right side of the page.
- Make the changes you require
- Scroll down and click Save
- If you go back into the content list - you will need to 'Reset' the filter so that you can see all the changes.
You are likely to encounter this problem when pasting your content / text directly from Word. It happens because when you paste through to the website, Word automatically tries to preserve its own formatting (things such as font styles, sizes, linespacing etc) of your original document. Unfortunately the HTML Word generates behind your text is non web standard and of poor quality. It contains code that will try and override the choices for font, text colour and layout that will build into your website.
If you have copied your content from another location including Microsoft Word or an Email - it will have formatting tags attached to it that you can't see. To remove these tags, YOU MUST paste the content into a plain text formatting file (such as Notepad on Windows or TextEdit on a Mac ), before you paste it onto your webpage.
The WYSIWYG editor will provide a basic ![]() paste as plaint text option to be used but where possible, pasting from notepad/textedit is always ideal.
paste as plaint text option to be used but where possible, pasting from notepad/textedit is always ideal.
If you forget to do this, then copy it again from your web page and paste in notepad and re-paste to your webpage - you may still leave some of the hidden formatting behind.
The way to check if you have done this, is click on the 'Disable rich-text' immediately at the bottom the typing block and see if there is any code left on the page after you've cut and paste it out. Remember to click on 'Enable rich-text' again before you paste or start typing.
If you want to have different types of font on your webpage, you will need to speak with Aspedia to add extra styling to your website. We encourage clients not to do this, as many computers don't have all the fonts that you have, and may view your text very differently to the way you see it.
We choose a font that matches your brand when we first set your website up, and give you different sizes so you can format your text, however, we rarely provide different colours or different fonts for you to choose from to maintain a consistent standard.
Here is a step by step guide to download (with screen shots) to help you. Alternatively, you can just read the information below (without screen shots)
When your website is built, the developer will have created a number of different content types, for example, a standard page, a testimonial, a form, an faq, a gallery item, an event etc. You firstly need to determine what new type of content you wish to create on your website.
- Go to the administration menu and click - create content
- Choose from the list which type of content you want to create
- Complete all the fields
- Scroll down and click Save
If you want to review or edit this page after it's been created, see our section on editing content.
Here is a step by step guide to download (with screen shots) to help you. Alternatively, you can just read the information below (without screen shots)
Images
Images are a great idea to have in a page if you have alot of content as this will break the content up and make it more appealing to read. It is important to consider that image types can severely affect a users loading time and an efficient file type for the particular image should be chosen.
Image Preparation
The WYSIWYG editor can only support the following formats:
- .jpg / .jpeg - If the image has a lot of colour or gradient, but no transparency. The preferred format for uploading photos.
- .png - Preferred format for 8 bit and 16 bit with a lot of colour, gradient and transparency. Complex images may result in a higher file size.
- .gif - Most effective for images that have few colours and little or no gradient e.g. primary colour logos. Ineffective for detailed images colour heavy images such as photographs.
The ideal size of an image is under 100kb, if it's a little bigger it doesn't matter, it just starts slowing the page down. However, try not to go over 500kb. If you have lots of images on one page - it will really slow down the load time, which can be unpleasant for the user and the search engines.
It is preferrable to resize your image to what you expect to appear on your website before you upload it. We recommend your standard computer resizer such as Microsoft Office Picture Manager. Choose the image from your computer, right click and open with "Microsoft Office Picture Manager", from "picture in the menu" choose resize or crop. Then click OK and save.
Inserting an image in the WYSIWYG
- Make sure that you are logged in.
- Go to the page that you want to add an image.
- Click on Edit.
- Place your cursor in the "Body" where you want to insert your image.
- Click on the "Insert/Edit Image" button.
- A new window will open "Image Properties" click on the "Browse Server" in the top right side of the window.
- A new window will open. This is the server location where your uploaded images will be kept. You need to upload the image from your computer to here.
- Click "upload" in the left corner. Then Browse to choose from your computer which image.
- Click "Browse" you can now choose the image that you want to upload.
- Highlight the image and click "open".
- This will return you to "File Browser" window, Click "upload".
- Once uploaded the image will appear in the list of uploaded images.
- The image you have just uploaded should be highlighted in the list. Hit the enter button to confirm your choice of image.
- You will now return to the insert box.
- You should set up the properties of your image at this point. If you forget to do this first time, you can highlight the image click insert button again and repeat this process.
- If the image has already been resized (which is preferable, as per above) leave the width and height. If you need to change the size of the image after it's been uploaded, this is where you can choose the dimensions.
- If you would like a border on your image choose in pixels the width, a good size is 10.
- Horizontal and Vertical space allows the content to wrap around the image, putting a value in these fields is important if you also have text on the page. We recommend 5 or 10 pixels. You will see the white spacing get larger around the image in the text box before you click ok - readjust the pixel sizing if you need to.
- To align where you would like your image to sit in relation to the cursor position, we recommend you choose either left or right of the page.
- Click Ok and the image will appear in the "Body".
- Click "Save" at the bottom of the web page.
- The image will now be inserted on your page where your cursor was.
Before you upload an image you need to ensure that it is in the correct format.
Additional Tricks
When you insert an image you may notice that the image can be a little hard to get in the right spot. You are able to work around this quite easily.
- Getting an image to line up with the top line of text - Click to the right of the top line of text and hit enter. Click on the image and drag it until you see the cursor bar hit the new top line and let go of the mouse.
- Getting an image to move to a certain position - Use your alignment affects to guide your image to your desired location.
- To make your next line of text go directly underneath your previous line of text - Hit shift + enter to avoid creating a new paragraph.
The WYSIWYG editor also provides the ability to resize the image dimensions from within the website. Ideally resizing and cropping should be done before uploading the image online. This is because the website user is still actually downloading the full image; it is just resized within the browser which means the user is downloading a file that is larger than it needs to be. With in most browsers the image will appear to be lower quality when not viewed at 100% of its original size. Conversely if the image is original smaller than the desired resize, some pixilation or image degradation will occur.
Here is a step by step guide to download (with screen shots) to help you. Alternatively, you can just read the information below (without screen shots)
Inserting and Removing Links Guide
Linking to a Webpage
Linking to other webpages is useful for a couple of reasons. The first is that, it helps with search engine optimisation, as search engines understand the text which has a link on it must be important. So it's beneficial to use good keywords in your 'link text'. The second is that it helps with usability for your customers to find their way around your website. If you link related pages then customers will easily be able to find it. The third is that you might want to reference another website, or an authority in your industry to show that you are genuine. However, please note that when you do link to an outside website - there are extra steps so that you don't loose your customer to another site - see below.
To link text to a webpage within your website:
- Make sure that you are logged in.
- First choose the page that you want to link to (not link from). You will need this page number at a later stage - go to the page, hover over the "edit" button - don't click it. When you hover over it, you will see in the bottom left corner of the page, the node number. Write this down. For example, it might be http://websitedomain.com.au/node/29/edit. Write down /node/29 (you just need the node and number)
- Now you should choose where you want to link from. Go to the that page and click edit.
- Highlight the text in the body where you want the link to appear (as mentioned above, use keywords in this text, not just 'click here').
- Click the "insert/edit link"

- Insert in the URL field the destination page number or node number that you previously wrote down - including the / before the node and the / between the node and page number ie /node/29 (you will notice the protocol will automatically change to <other> - this is correct - don't change it back).
- Click Ok.
- This will go back to the "Body" .
- You will now notice that the content you selected to link will be a different colour. The link will not work until you have saved the page.
- Click "Save" at bottom of the page.
To link to a webpage outside of your website:
- Choose the webpage URL that you want to link to for example: http://ato.gov.au/faq. The page can be an article or a blog or any webpage that is online. Write down or copy this URL address.
- Make sure that you are logged in.
- Now you should choose where you want link from. Go to the that page and click edit.
- Highlight the text in the body where you want the link to appear.
- Click the "insert/edit link" button
- Insert in the URL field the destination you wrote down or copied ie http://ato.gov.au/faq
- This time you will have extra steps - click on the "target" tab in the window.
- Select from the drop down menu "new Window (_blank)" if you wish the link to open in a new window
- Click ok.
- This will go back to the "Body" .
- You will now notice that the content you selected to link will be a different colour. The link will not work until you have saved the page.
- Click "Save" at bottom of the page.
If you ever need to remove a link:
- Be in edit mode
- Double click the link
- Click on the "Remove link" button, or change the link address that you have entered.
- Save your page.
Linking to a document, including .PDF, .doc, .xls
To link text to a document hosted on your own site is a two step process. First you will need to upload that document from your computer to the server and then link to it.
- Ensure that you are logged in and go to the page where you want to add the link to the document.
- To add the document to the server, scroll down to the bottom section of the page until you find "File Attachments".
- Click browse, locate the file on your computer, highlight and double click or click open and then "upload". There is a size limit of 10MB.
- The file will now be listed under File Attachments.
- The file will then be given a URL that will be located underneath where you have uploaded the file.
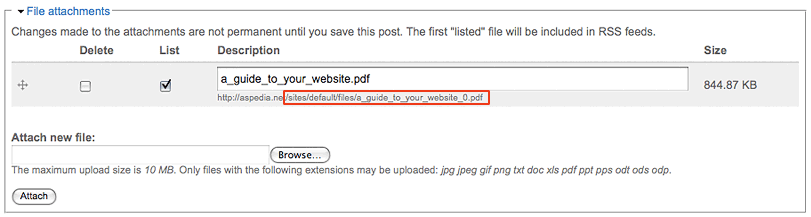
- Highlight the text from after your domain name starting with the first /. (you can highlight by dragging your mouse over the link).
- Copy the text (right click with your mouse and then select "copy")
- Untick the "List" box.
- Scroll back up to the body
- Highlight the text you want to link from.
- Click the "insert/edit link" button
- Paste the URL for the PDF (right click with your mouse inside the box and select "paste"), including the first /. (in this example it would be /sites/default/files/how_to_master_google_win.pdf).
- Click on the "Target" tab and select "New window (_blank) if you wish to tell the link to open in a new window
- Click ok - you won't be able to view the link working until you save the page.
- Save your page.
Please Note: if you want your page to include a list of the files you have uploaded at the bottom of your content on this page - skip step 9. Untick the "list" box.
Anchor Link
An anchor link allows you to jump from one section of text to another on the same web page. You would use anchor links when you wanted to list topics at the top of the page and then have the ability for a customer to click that topic and be taken straight to it without having to read or scroll through the balance of the text.
This is a two-step process. First, you must create an Anchor on the destination before you link your text to it.
1. Creating an Anchor
- Ensure that you are logged in and go to the page where you want to add anchors.
- Be in edit mode.
- Scroll down the page to where you want to add your first destination anchor.
- Place your cursor where you want the customer to land, (no need to highlight text as Anchors are applied to a line, not a word).
- Click the "insert/edit anchor" button

- Give your anchor a name that will make sense when you want to link to it. (Ensure your anchor has no spaces and you separate words by using - or _).
- Click ok.
- Create all your anchors for your page first.
2. Creating a Link to the Anchor
- Scroll back up to the top of your page and highlight the text where you want your first anchor.
- Click the "insert/edit link" button
- Click the "link type" down arrow and select "link to anchor in the text"
- Select the anchor you wish to link your text to
- Click ok
- Once you have linked the text you will see that it is a different colour.
- Click "Save" at bottom of the page.
Please note: It is also good practice to put an anchor at the top of your page called home, you can then add a link at the bottom of your content on text that says "return to the top of page".
Tables
Tables are great to use if you have content that needs to go into columns e.g. stock sizes and prices. Inserting a table is simple and looks nice and neat once complete.
Inserting a Table ![]()
- Make sure that you are logged in.
- Go to the page that you want to add a table.
- Click on edit.
- Place your cursor in the "Body" of the page where you want your table to appear.
- Click the "Insert/Edit Table" button in the WYSIWYG.
- A new box will open select how many columns and rows you want in your table, along with the width and height and click "Insert".

Some of these such as rows and columns are obvious. Others are less so. We would recommend that you change some of the default values in order to get your table better suited to the content.
Headers - The header section will allow you to have preset bold headings which can be defined as either the first row, column or both. While this can also be applied with the bold option on standard text, this may be easier to use if all headings are consistent.
Width - This can either be in pixels (px) or percentage based.
Height - If you want the table to be a fixed height, you can enter this here. Normally it's best to leave this blank and the table's height will then automatically expand to fit the content.
Border Size - If you don't want borders to be visible then change the Border Size to 0. To make thicker borders you can simply increase this number.
Cell Spacing & Cell Padding - Cell Spacing is the spacing between different cells. Cell Padding is the padding between the contents of a cell and the edge of the cell.
Alignment - This is where the table as a whole is positioned on the page. If your table has a 100% width, modifying this setting won't change anything.
- Once your table has been customized to your preference hit OK, and the table will now appear in the Body of the content.
- Click "Save" at bottom of the page.
Inserting text
- Click inside the box you want to put content into.
- You can format the content in the box by using the "WYSIWYG" (as explained earlier in the WYSIWYG Faq).
- You can also delete rows by using the "Delete Rows" button.
- You are also able to "Undo" what you just did.
Changing Properties of Your Table ![]()
These buttons will only be able to be clicked when you are inside a table. They allow you to:
- Change the properties of an individual cell
- Add or delete rows and columns
- Merge rows or columns
- Split rows or columns
Hover over each button to see which action each takes and choose the required button.
View our tutorial on how to "Insert a Table on a Drupal Website".
Page Breaks
Wikipedia's definition of a page break is - page break is a marker in an electronic document, which tells the document interpreter that the contents which follows is part of a new page.
Inserting a Page Break ![]()
You can insert a "Page Break" in a "Page, Blog or News page". This is simply done by using the " Separate the teaser and body of this content" button. Once you have this "Page Break" inserted you can then continue to write your content. Once you have saved the page and you view it, you will see all the content under the "Page Break" is now on a new page.
View our tutorial on "how to create a page break on a drupal website"
About 4 to 6 weeks as long as the designs are approved within 2 days of sending them to the client and the content is ready once the site is built.
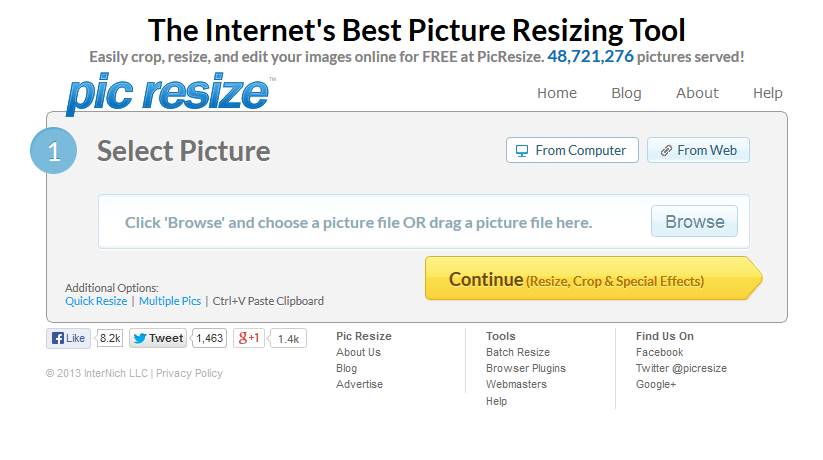
When providing images for your website, you may need the picture to be a specific size in order to be uploaded. If the image is too large there are several ways to resize them.
We have found a free online tool that can make this process easy.
Instructions for Single Image Resize
1. Visit www.picresize.com and upload your picture
2. Here you can crop and resize the picture by following the instructions.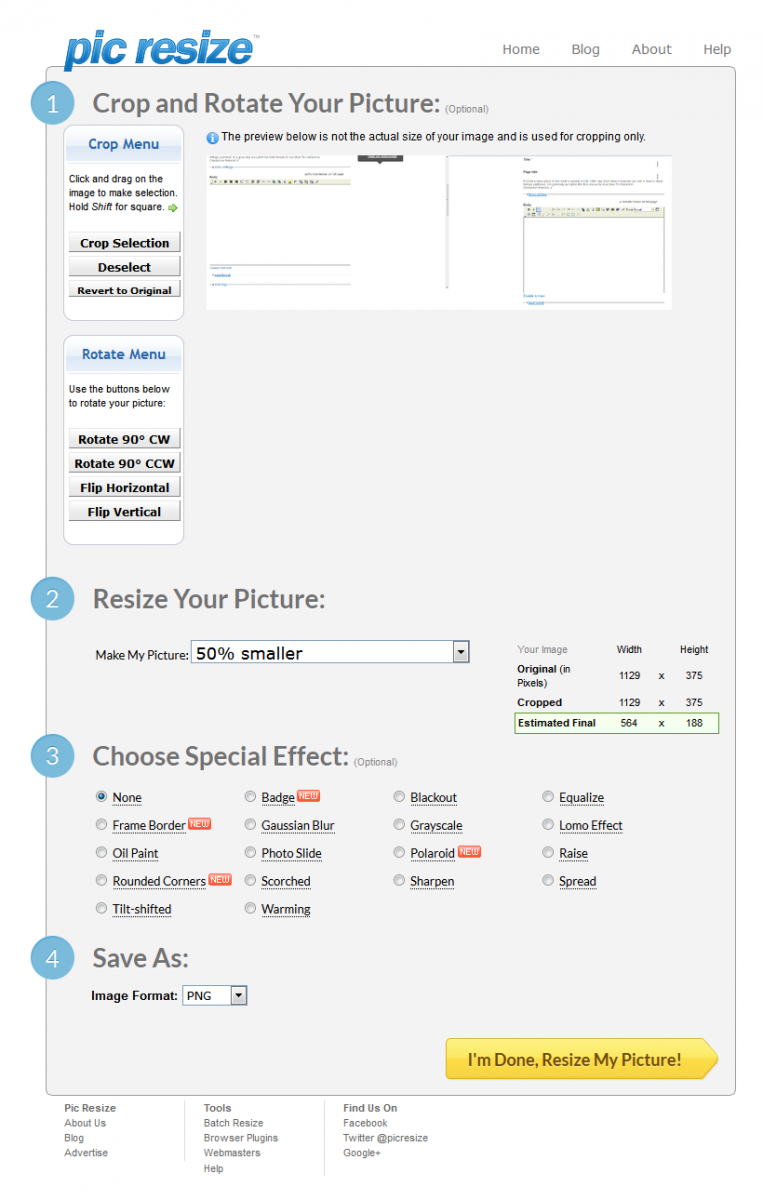
3. Select the image format PNG, JPEG, GIF (if your not sure which format to chose ask your project manager). Click done resize my picture and save the file.
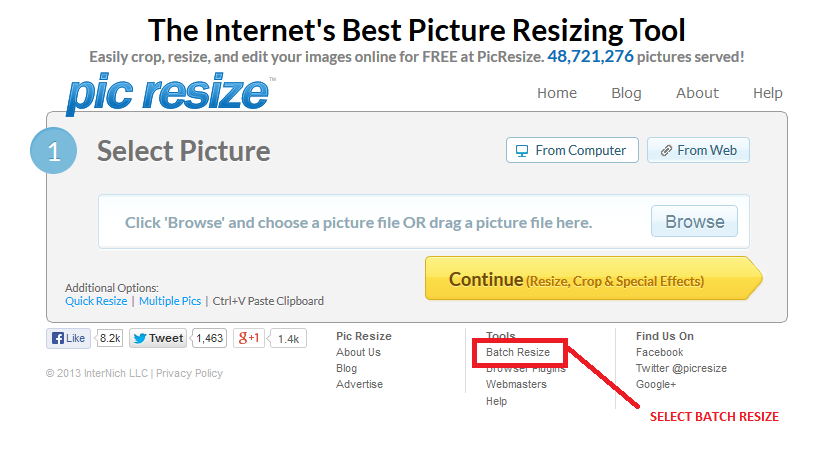
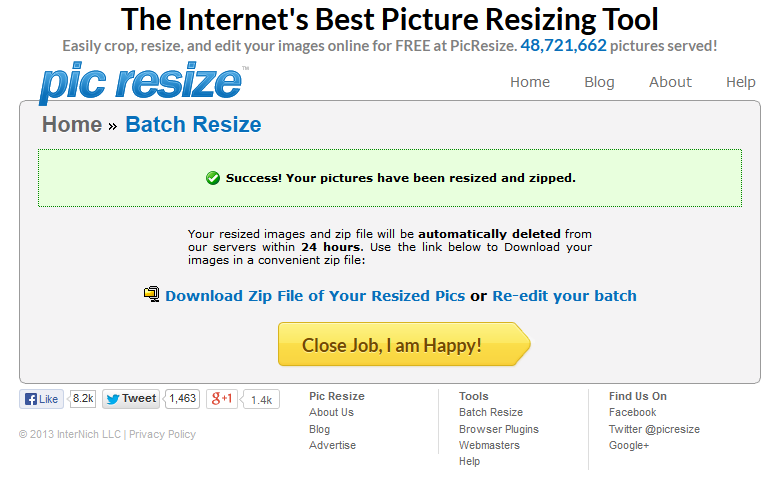
Instructions for Batch Image Resize
1. On the home page select batch resize.
2. Click add files.
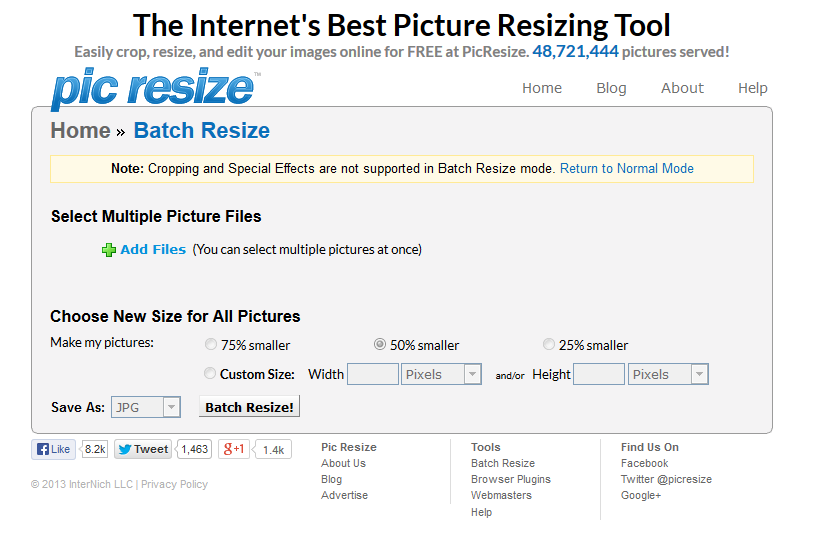
3. Select all of the images you wish to upload.
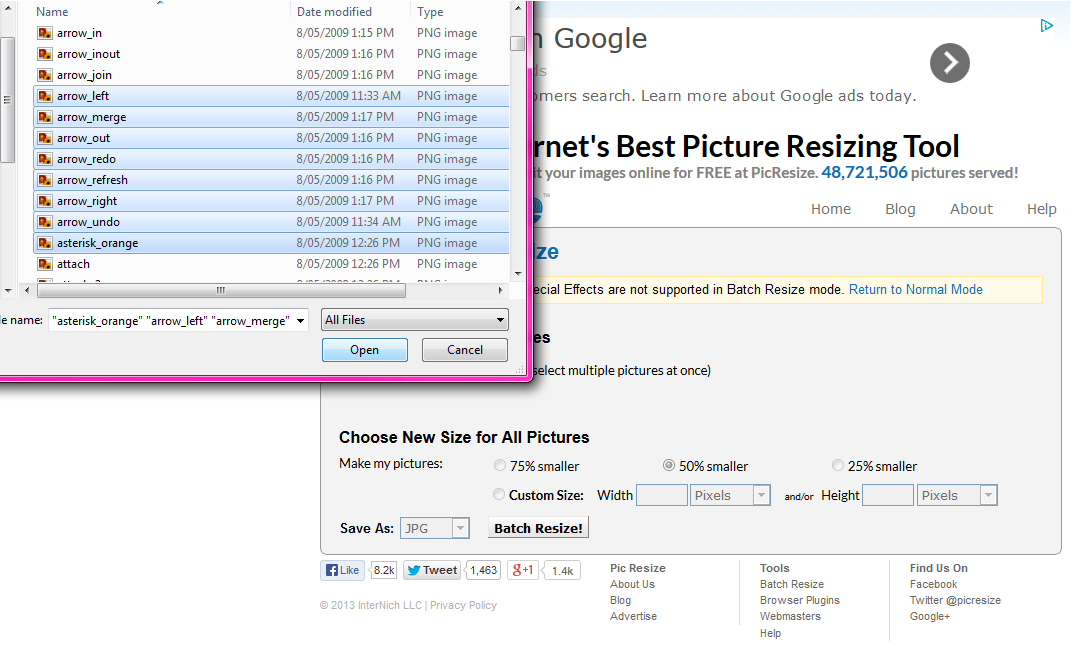
4. Select upload to upload the files.
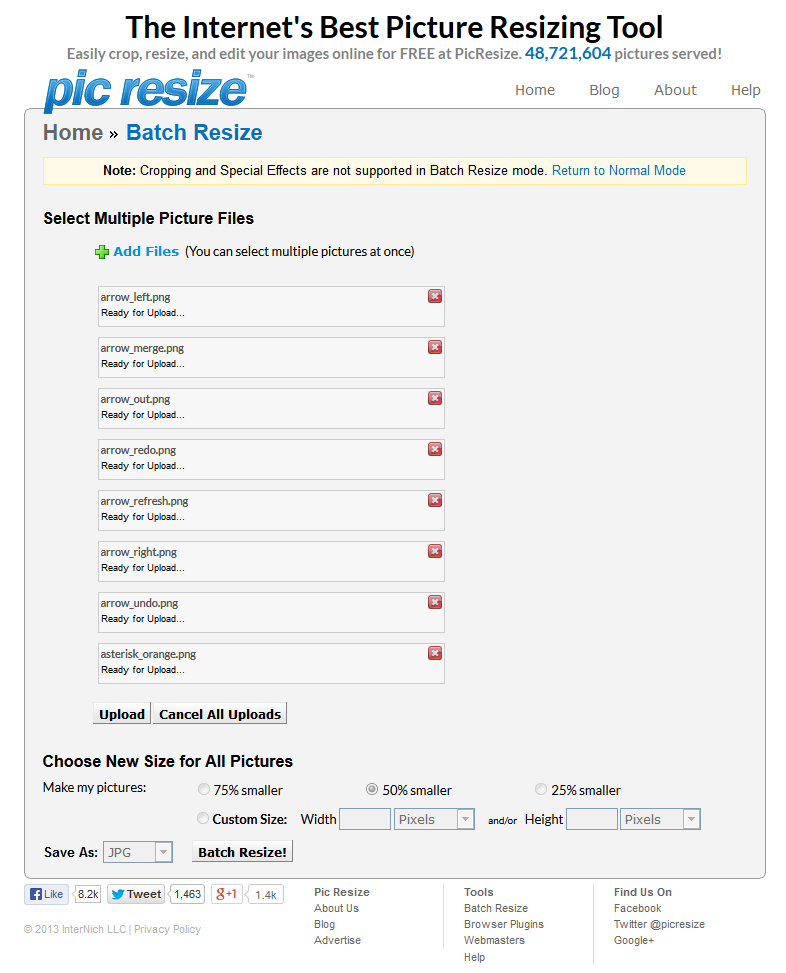
5. Once all of the files are uploaded select the size you wish the images to be and the file type followed by batch resize.
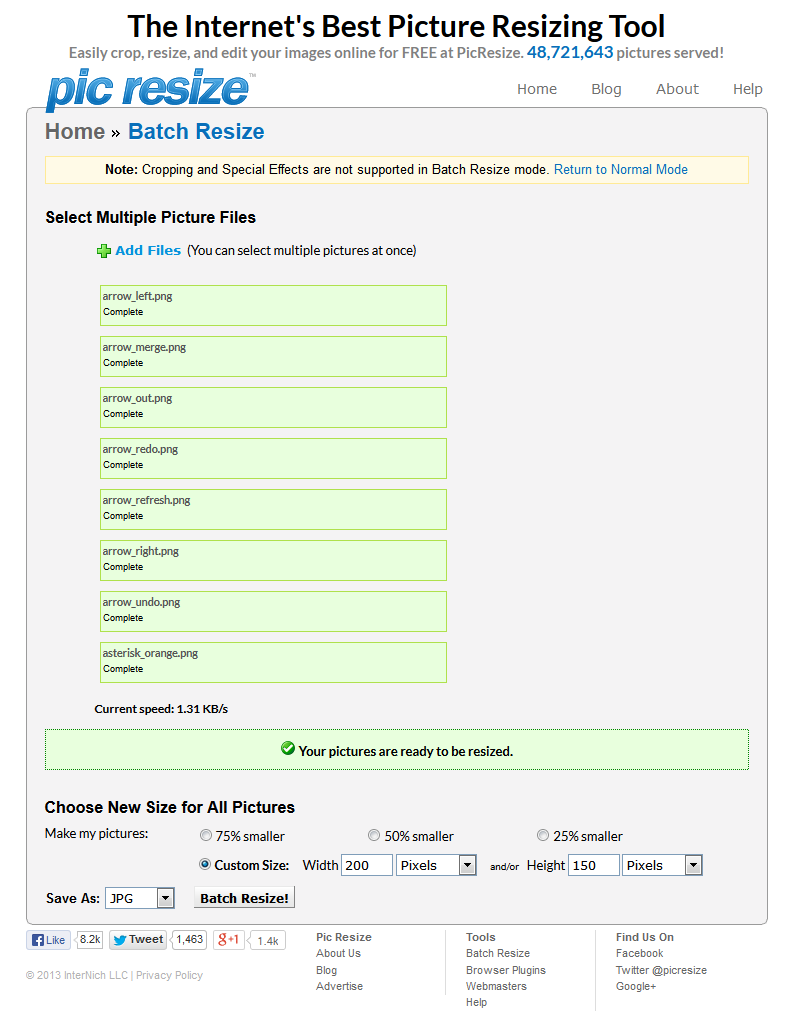
6. When the images have been resized you need to download and save the zip file, once these are saved you can extract all the files from the zip.
Webforms are used to help the customer communicate with your company. Some well known examples include 'Contact Us' forms and 'Feedback' forms. Below are some instructions to help you create and edit your webforms.
Please see the document below for more detailed instructions (with screenshots)
Creating and setting up a new webform
1. Log into your website under the 'webmaster' account.
2. Select 'Create Content' from the black toolbar at the top, followed by 'Webform'.
3. Give your form a title, add a bit of a description, scroll down to the bottom and click 'Save'.
4. After saving, the page will present a 'Webform' section where you create the fields to go on the form. Create the appropriate fields for your form. Note: You will be required to fill in more information with each field you create.
5. Underneath the highlighted tab 'Webform', there is a sub toolbar. Within this toolbar, you can adjust the settings of this form. Such settings include what email address this form is sent to once it has been submitted. By selecting the 'Emails' sub tab, you will be presented with a page that will allow you to enter an email address to send the form to. Once an email has been entered, select 'Add'.
6. You will be taken to a page with more settings, if you wish, you can change them. It is recommended that you leave these settings as the default and scroll down to the bottom and click 'Save E-mail Settings'.
7. Next select the sub tab 'Form Settings'. This will take you to a page that allows you to create a confirmation message that lets your users know the form has been submitted successfully. After typing up a message, scroll down to the bottom and select 'Save Configuration'.
8.Go back to the 'Form Components' sub tab and click 'Save Component'.
You have now set up a new webform
Editing a webform
1. To edit a form, make sure you are logged in.
2. Select 'Content Management'.
3. Scroll down to webforms and search the content until you find the form you wish to edit.
4.View the form.
5. Select the edit tab that appears right above it.
6. If you want to change who is receiving the email - click on email and alter what is already there or create a new email address.
7. If you want to change the screen message that is displayed to the user after pressing the submit button, click on form settings. Either edit what is in the confirmation message or scroll down to see what page (or node number) the user is sent to. Go to that page number and the edit the wording on that page.
8. To view who has completed the form view results, you can view them on screen or download the details
9. Select 'Save'.
This can be done through your website. You must first log in to do so.
1. Log in
2. Click 'E-commerce' tab on the black bar at the top of your screen
3. Hover over 'Transactions' then select 'Transactions List'
The page that loads is a list of all the transactions that have taken place on your website. From here you can edit, delete and update them.
Please see the attached document for further instructions.
There is a list of all your content pages and other content types in your administration menu:
- Login to your website
- In the top menu choose: content management
- Choose content
- Filter to choose type= page (or reset - to see everything)
- If you saved it recently it will be at the top of the list.
- Click on the page title to go to the page or click on the edit button to the right to go straight to edit.
You can choose to put this page into a menu before you save it if you want to access from a menu.
Or you can:
View all unpublished content by:
1. Select ‘Content Management’ in the administration bar
![]()
2. Select ‘Content’
3. On the left hand side in the menu select‘Find Content’
4. Use the filter ‘Status’ and set it to ‘Not published’

This will show ALL unpublished content on your website, including pages. From here you can select ‘Edit’ and then change the content to ‘Published’ or add it to a menu.